


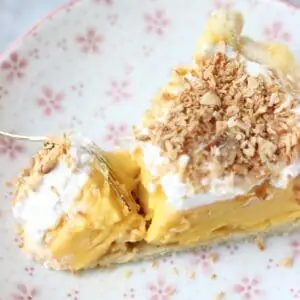
This Gluten-Free Vegan Coconut Cream Pie is:
- crispy and flaky
- rich and creamy
- sweet and fragrant!

Inspired by my Lemon Pie and Blueberry Cheesecake recipes, I decided to make another fresh, creamy, summery dessert. And, as my Coconut Cake recipe has been pretty popular, I figured you guys must love coconut as much as I do, so decided to make this Coconut Cream Pie!

The first step is to make a simple press-in pie crust which is made using 3 basic ingredients: coconut oil for buttery flavour and crispiness, ground almonds for flakiness and gluten-free flour. If you're not into gluten-free flour, you can use rice flour, or just use plain flour if you're not gluten-free.

As there's only one layer of pie crust required and you can just press the crust into the pie dish with your fingertips, you don't need to worry about getting out a rolling pin or dirtying a kitchen surface with a bucketload of flour.
Then you just need to bake the crust in the oven until it's crispy and golden brown! One thing you do need to remember is to use a fork to pierce the entire surface of the pie (don't forget the sides!) to make sure the crust doesn't inflate whilst baking. You can alternatively use baking beans.

Whilst you're baking the crust, you also need to bake some desiccated coconut until it turns golden brown, toasty and fragrant. One word of caution - coconut does burn super easily, so be really careful to not leave it in for longer than 5 minutes!

The next step is to make the custard - quite happily, most shop-bought custard powder happens to be naturally vegan, gluten-free and free from added sugar, so this is what I like to use to make the custard part of this Coconut Pie. It's easy to make, can be made using a variety of different plant-based milks: I like unsweetened cashew milk, almond milk or oat milk.

I use this custard powder, which I love because it's easily accessible and is made using just 4 simple ingredients!

Once you've made your rich, velvety custard and poured it into your baked pie crust, you need to put it in the fridge until it's set completely. The next step is to make some coconut whipped cream, which you can use to top your Coconut Pie with fluffy clouds of rich, melt-in-your-mouth, coconut-flavoured cream.

Once you've topped your Coconut Pie with the coconut whipped cream you can scatter over your toasted coconut and it's ready to eat! I absolutely love the combination of the crispy, flaky pastry crust with the creamy custard, rich coconut whipped cream and fragrant desiccated coconut.
It's a simple make-ahead dessert, so it's perfect for summer entertaining and is sure to be a hit with all the family!

For more similar desserts, check out my:
If you try out this recipe or anything else from my blog, I'd really love to hear any feedback! Please give it a rating, leave a comment, or tag a photo #rhiansrecipes on Instagram! Thank you.
Helpful tools to make this Gluten-Free Vegan Coconut Cream Pie:
For the crust:
glass mixing bowl
pie dish
For the coconut:
rectangular baking tray
For the custard:
measuring jug
For the coconut whipped cream:
electric whisk
Gluten-Free Vegan Coconut Cream Pie
Ingredients
For the pastry:
- 30 g (⅛ cup) coconut oil
- 75 g (⅔ cup) gluten-free flour blend (or sub rice flour, or plain flour if not gluten-free)
- 75 g (⅔ cup) ground almonds* (almond meal)
- 7 tablespoons water
For the coconut:
- 30 g (½ cup) desiccated coconut
For the custard:
- 530 ml (2 ¼ cups) unsweetened cashew milk (or sub unsweetened almond milk, or unsweetened oat milk for nut-free)
- 4 tablespoons custard powder** (ensure vegan/gluten-free if necessary)
- 6 tablespoons maple syrup (or sub any other sweetener)
For the coconut whipped cream:
- 400 g (14oz tin) of full-fat coconut milk
- 2 tablespoons maple syrup (or sub any other sweetener)
- ½ teaspoon vanilla extract
Instructions
For the pastry:
- Preheat the oven to 180 degrees Celsius (350 degrees Fahrenheit)
- Combine all ingredients in a large bowl until it forms a firm dough - add the water a few tablespoons at a time so that you don’t add too much!
- You can keep this pastry dough in the fridge for up to a day if you like, but there is no need to chill it before using
- Place the pastry dough into a greased pie dish and use your fingers to carefully press it across the bottom and up the sides of the dish - I used a 20.5 cm/8 inch pie dish
- Use a fork to pierce the surface (remember the sides too!) of the pastry, so that it doesn’t puff up in the oven. Alternatively, you can use baking beans
- Bake in the oven for around 30 minutes, until the pastry crust is firm to the touch and golden brown
- Leave to cool slightly before pouring in the filling
For the coconut:
- Lay out the desiccated coconut on a baking tin and bake in the oven for around 5 minutes, making sure it doesn’t burn
For the custard:
- Measure out the milk in a jug or measuring container
- Pour the milk into a pan, leaving behind a few tablespoons of milk in the jug
- Heat up the milk in the pan
- Add the custard powder to the remaining milk in the jug and mix well, ensuring it has dissolved completely
- Once the milk in the pan is steaming, add approximately half of the hot milk to the bowl with the dissolved custard powder, mix well and transfer the custard powder mixture to the saucepan
- Mix well and keep stirring on a low heat for around 5 minutes, until thickened
- Add the maple syrup, taste and add extra if desired
- Once the pastry crust and the custard have both cooled a little, carefully pour the custard into the crust
- Leave the pie in the fridge for up to a few hours to set completely before topping with the cream
For the coconut whipped cream:
- You’ll need to keep your tin of coconut milk in the fridge overnight for the rich creamy bit to separate from the watery bit at the bottom. Make sure it is full fat coconut milk, otherwise this separation won’t happen and you won’t be able to make this cream!
- Open the tin upside down – the coconut cream will be at the bottom and you can just pour off the watery liquid (save this for adding to soups or smoothies)
- Place the thick, creamy part into a bowl
- Add the maple syrup and vanilla extract
- Use an electric whisk (or a manual one and a lot of elbow grease) to whip up the coconut cream until light and fluffy
- Take the pie out of the fridge, and ensuring that the custard has completely set, carefully cover it with the coconut whipped cream
- Scatter over the toasted desiccated coconut
- Tastes best when fresh, but keeps covered in the fridge for up to a few days
Notes
Disclosure: This posts contains affiliate links to Amazon. If you purchase any of these products, a small percentage will come to me with no extra cost to you! This income will go towards the running of this blog - thank you.

Faye
Absolutely delicious recipe Rhian, thanks so much as always 🙂 xx
Rhian Williams
Thank you so much!
Seonaid
This looks amazing! Buuuut, I absolutley detest custard can you suggest a good replacement filler?
Rhian Williams
Thank you! And instead of the custard you could use the cheesecake filling part of my blueberry cheesecake recipe, without the cacao butter if you like as it's not completely necessary: https://www.rhiansrecipes.com/vegan-blueberry-cheesecake-gluten-free/ hope that helps!
Laura J
Hi there! Is there any reason why you couldn’t use drinking coconut milk for the custard?
Rhian Williams
No that should work!
Vanessa
Obsessed with your pie crust so this is next. Any chance of adding a touch of vanilla extract and/or coconut extract to the cream filling for a little extra? Or not necessary?
Rhian Williams
Thank you so much! Yes sure, please add some vanilla extract or coconut extra to the cream filling as you like!
Gigi
Would gelatin work in lieu of cornstarch here?
Rhian Williams
Hi! Yes that should be okay!