


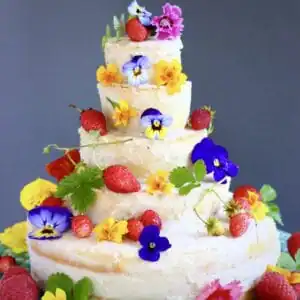
This Gluten-Free Vegan Wedding Cake is easy to make, deceptively impressive and seriously delicious.

Whether you're just looking for some inspiration for your special day, in charge of baking a gluten-free vegan wedding cake for your friend, or in need of something to ask your caterer to make for you, I really hope this recipe will come in useful!

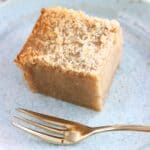
For the sponge, I used my go-to gluten-free, vegan and refined sugar free sponge cake recipe, which I love because it comes together easily in one bowl and requires simple, familiar ingredients. It's also very versatile, as you can use any type of oil you want, any type of liquid sweetener, and any type of milk.

Although I've used this sponge recipe to create all sorts of cake flavours such as chocolate, matcha, red velvet and coffee, I decided to go with a simple, vanilla-flavoured one as the base for this cake. I also added some lemon juice for a little brightness, and it also works well to balance out the richness of the cashew buttercream.

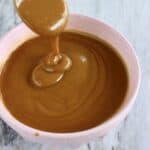
Although I usually use sweet potato or coconut whipped cream for frosting cakes, I decided to go with cashew nuts for the buttercream frosting for this cake. I added some cacao butter to the icing too, which creates an elegant white chocolate-like flavour.
You'll also love the texture of this buttercream - it's super rich, melts in your mouth just like real buttercream, and is just perfect for spreading around the edges to create one of those 'naked' wedding cakes that seem to be so trendy nowadays.
Although cashew nuts and cacao butter can be expensive, and they make for a much richer frosting than, say, sweet potato purée, if you're not going to splash out on your wedding day, when else can you?

I also decided to spread some strawberry jam in between the layers of the sponge - where's nothing better than a simple vanilla sponge sandwiched with some sticky jam and smooth buttercream.
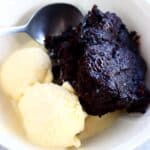
This, paired with the luxuriously creamy texture of the blended cashews means the cake ends up tasting a lot like these Strawberry Chocolate Truffles --> SO good.
If you're not into strawberry, you can use any other flavour of jam you like. And if you'd like to keep the cake refined sugar free, be sure to use a naturally sweetened jam, or you could even make your own!

Although this cake might look a little fancy, it's seriously much easier than most other celebration cakes as I've gone for a 'naked' style cake, which means all you need to do is roughly coat all the outer edges using a spatula or knife, rather than fussing about with fondant icing and such.
I then decorated with a handful of edible flowers (which I luckily managed to find in my local supermarket!) and some adorable little wild strawberries, which I had growing in my garden. You can really decorate with whatever you like though, anything like dried fruit, freeze-dried fruit, rose petals, fresh fruit, cacao nibs, nuts or seeds would work well.

If you try out this recipe or anything else from my blog, I'd really love to hear any feedback! Please give it a rating, leave a comment, or tag a photo #rhiansrecipes on Instagram! Thank you.
Helpful tools to make this Gluten-Free Vegan Wedding Cake:
For the cake:
glass mixing bowl
measuring jug
18 cm / 7 inch sandwich baking tin
baking paper
cooling rack
For the frosting:
food processor
blender
palette knife for frosting
Gluten-Free Vegan Wedding Cake
Ingredients
For the sponge:
- 120 ml (½ cup) coconut oil (or sub olive or vegetable oil)
- 400 ml (1 ⅔ cup) unsweetened almond milk (or any other plant-based milk)
- 4 tablespoons lemon juice
- 190 ml (⅘ cup) maple syrup (or sub any other liquid sweetener)
- 1 teaspoon vanilla extract
- Pinch salt
- 300 g (2 ½ cup) ground almonds (almond meal) *
- 300 g (2 ½ cup) gluten-free flour blend (or sub plain flour if not gluten-free)
- 4 heaped teaspoons baking powder (ensure gluten-free if necessary)
- ½ teaspoon bicarbonate of soda (baking soda)
For the buttercream:
- 200 g (1 ⅔ cup) raw cashew nuts soaked in cold water overnight or in hot water for 15 minutes
- 50 g (1.7 oz) cacao butter
- 3 tablespoons maple syrup
- 12 tablespoons unsweetened almond milk (or sub water or any other plant-based milk)
- 1 teaspoon vanilla extract
To frost and decorate the cake:
- 10 tablespoons strawberry jam (ensure refined sugar free if n)ecessary
- Suggested decorations listed below **
Instructions
For the cake:
- Preheat oven to 180 degrees Celsius (350 degrees Fahrenheit).
- Place the coconut oil in a large bowl and melt over a saucepan of boiling water or in the microwave (skip this step if using any other oil).
- Once melted, add the milk to the same bowl along with the lemon juice, maple syrup, vanilla, salt and ground almonds.
- Sift in the flour, baking powder and bicarbonate of soda.
- Mix well, adding a tiny splash more milk if it’s looking too dry.
- Transfer mixture into greased baking tins lined with baking paper (I used two 7inch/18cm baking tins and then used four metal rings lined with greased baking paper, which each measured 4.5inch/11.5cm, 3.5inch/9cm, 2.5inch/6cm and 2inch/5cm. Or you can use baking tins if you have ones of varying sizes).
- Bake in oven for around 15 minutes until risen and an inserted skewer comes out clean.
- Turn all the cakes out onto wire racks to leave to cool completely before frosting.
For the buttercream:
- Drain soaked cashews and add to a food processor or blender along with all the other ingredients***.
- Whizz until completely smooth.
- Taste and adjust flavour if necessary, adding more maple syrup, salt or vanilla if you wish.
- Put the mixture (keep it in the food processor but you can transfer to a bowl if you wish) into the fridge and leave to harden slightly before using to frost the cake.
To frost and decorate the cake:
- Cut the smaller cakes in half horizontally using a cake slicer or a bread knife.
- Place half of the biggest cake onto a large plate or cake stand.
- Split the buttercream into even thirds.
- Using a spatula or knife, spread a third of the buttercream over the bottom layer of cake.
- Next, spread over 5 tablespoons of the jam.
- Finally, place the other half of the cake on top.
- Next, place the bottom layer of the second biggest cake on top, and spread half of another third of the buttercream onto this layer of cake.
- Then, spread over 2 tablespoons of the jam.
- Now, place the other half of that cake on top.
- Repeat this process for the remaining cakes, going in order of decreasing size. Divide up the remainder of the second third of the buttercream and the remaining jam between these cakes.
- Once these are all done, use a spatula or knife to spread the remaining third of the buttercream around the tops and sides of all of the cakes.
- Decorate however you wish - see notes for some suggested decorations.
- Best when fresh, but keeps in the fridge for up to a couple of days.
Notes
- Edible flowers
- Wild strawberries
- Fresh fruit
- Dried fruit
- Freeze-dried fruit
- Rose petals
- Cacao nibs
- Nuts
Disclosure: This posts contains affiliate links to Amazon. If you purchase any of these products, a small percentage will come to me with no extra cost to you! This income will go towards the running of this blog - thank you.

Jamie
I’m curious about your frosting. Is that frosting room temperature tolerant. I would like to use it on cupcakes but I can’t have it melt in 90 degree weather. I usually use shortening based frosting because it doesn’t melt in the heat
Rhian Williams
I'd say this is ok at that kind of temperature for up to a few hours or so, but any longer than that might be a bit dodgy. I'd recommend perhaps making. very small amount and testing it out in your climate to see how it turns out!
Ellie Reay
Hi, I am making this for 4 guests at my sons wedding. It tastes amazing. However,I didn't have ground almonds, so I substituted with 140gr more of gluten free flour,(Doves flour, UK) and 160gr of gram (chickpea) flour. It came out absolutely perfect with a moist light fluffy texture. Thanks for your recipe, so many other ones on the internet were a a complete flop and hit the bin!
Rhian Williams
Thank you so much, so happy to hear that! And thank you so much for sharing your substitutions, that's really helpful to know.
Allan
Can the Cacao butter be substitue with anything else?
Rhian Williams
Yes! You can use coconut butter, or coconut oil. Though the flavour will be better with coconut butter rather than coconut oil, which has a less neutral flavour. I hope that helps!